This section describes the general Sales procedures in Q360. The diagram below provides a visual outline of these procedures. Click on the boxes to learn more information about a specific process.
Sales#
Sales Basics#
Start here with Basic Sales Procedures.
For detailed instruction, see sub topics to the left.
Create a Prospect#

A Prospect is a Customer record with the Type field set to PROSPECT. Once the record is changed to CUSTOMER, it will be used for displaying general details such as Sales, Service, Project, and Accounting information.
- Go to Sales > Customers, then click the ADD icon. A New Company Name window will open
- Enter a Company Name and click OK
- In the new record, enter the Customer details and set the Type field to PROSPECT
- Click the SAVE icon
Note: the Sites tab will now display the Main Site information (auto-populated from what you entered on the Customer / Vendor tab)
Create a Site#

Site records track Company Site specific details such as Contacts, Sales, Service, Projects, and Accounting
- Go to Sales > Customers and search for a Customer record
- Click the Sites tab, then click the Add icon located in the Sites grid. A Site: Add form will open
- Enter the Site details in this form
- Click the Save icon
Create a Contact#

Contact records contain the general information for the Contact and their relationship to the linked Company. Users may link related Contacts, track Contact Activities, and view Sales Opportunities related to a Contact
Add to a new Customer record:
- Go to Sales > Customer and click the ADD icon
- In the New Customer Name window that appears, type a Customer Name and click OK
- In the newly created Customer form, in the Contact No field, start typing a Contact name. If the Contact already exists, they will be displayed and you may select them. If they do not exist in the system, click the Add option in the Contact field drop down menu. The Add Contact form will open and you may fill in as many details as you wish for the new Contact
- Click the Save button on the Add Contact form / Save icon on the Customer record
Add using the Contacts tab of an existing Customer record:
- Go to Sales > Customer and search for a Customer record
- Click the Contacts tab, then click the ADD icon
- In the new record, enter the Contact details
- Click the SAVE icon
Sales Opportunities#
Sales Opportunities in Q360 are used to track potential deals through a sales pipeline — from initial lead/qualification all the way to won or lost — while capturing estimated value, probability, timeline, related contacts/accounts, and the activities needed to close the deal. They drive forecasting, pipeline reports, and the handoff into projects/orders when a sale is won.
For detailed instruction, see sub topics to the left.
Create a Sales Opportunity#

Sales Opportunities allows Sales personnel to better manage their Prospects and provides Management the ability to track activity within the Sales Department.
To create a Sales Opportunity from an existing Customer Site:
- Go to Sales > Customers, and open a Customer record. Click the Sites tab, then open the Opportunity tab. Click the ADD icon
- In the Opportunity: Add form that opens, fill in these recommended fields for Sales and Labor (labour) forecasting:
- Interest | business Opportunity Prospect Customer is interested in; determines default Sales Funnel Template, if configured
- Value | amount of the Sales Opportunity
- RMR | amount of Monthly Recurring Revenue, if applicable
- Close Date | date you expect a decision to be made and close out the Opportunity
- Install Finish | date you expect the Project to be “substantially completed,” if applicable
- Sale Type | specified line of business of this Sale to be reflected on the linked Quote / Order
- Source | source of Sales Opportunity
- Fill in Scope of Work details in the SOW tab
- Click the Save icon
- Once saved, verify the following:
- Opportunity tab > Funnel subtab
-
- The grid will pre-populate with the default Sales Funnel template steps – if configured for the “Interest” value of this Sales Opportunity
- If the “Interest” was not configured – or you wish to select a different Sales Funnel template – you still have the option to do so by clicking the Funnel grid “Link…” icon
-
- Team tab
-
- Optionally, you may include the names of key stakeholders related to this Opportunity as they become known, e.g. Employees (e.g. Sales Engineer) and / or Contacts (e.g. Prospect decision maker)
-
- Opportunity tab > Funnel subtab
To create a Sales Opportunity from the Customer record Sales Opps tab:
- Go to Sales > Customers, and open a Customer record. Click the Sales Opps tab, then click the ADD icon
- Complete steps 2-5 above
Note: Selection of the Sales Opportunity Sale Type value impacts whether a Call / Project / Service Contract is created on approving the corresponding Sales Order, with values dependent on your system configuration (General Code Unified Type “UNIFIEDTYP”). For instruction on creating Sale Types, check out Opportunity Sale Types (Unified Types)
See additional key fields, definitions, and video in article Sales Opportunity Form Key Fields
Time Bill Against an Opportunity#

Time billing against an Opportunity allows you to track the amount of time spent working on that Opportunity
Start / Stop a Time Bill from the Opportunity record
- Open an Opportunity record
- Click the TIME BILL icon. A “Start Time Bill” window will open
- Click OK
- A Time Bill record will open. If any edits need to be made, click the EDIT icon, make desired changes and then click the SAVE icon
- To stop the Time Bill, open the Time Bill and click the TIME BILL icon again. A “Stop Time Bill” window will open. Click OK
Start / Stop a Time Bill from My Task List
- Go to View > My Tasks and locate a Task of type “Opp Task.” Click on the Time Bill (clock) icon in the TB column
- A “Start time bill” window will open. Click the OK button
- To stop the Time Bill, click the Time Bill (clock) icon again. A “Stop Time Bill” window will open. Click OK
Update Opportunity Reminders#
Opportunity Reminders are used to inform Sales personnel to perform actions. When Opportunities are assigned to a User, related Reminders will display in View > My Tasks for that User.
Adding Reminders can be done from the Sales Opportunity or from an Activity linked to the Sales Opportunity, in the scenario where more details are required to track the Sales Activity.

From the Sales Opportunity, add or update the Reminder details:
- Go to Sales > Opportunities and open the Opportunity record you want to view (Opportunities may also be accessed via a Customer record)
- Place the form in EDIT mode
- Click the Add Reminder Date icon next to the Reminder Date field. The Reminder modal displays with details. Note: if there is an existing Reminder Date in this field, you may delete this date first and select a new date.
- Complete all fields for which you have information and click OK. Note: mandatory fields are marked by an asterisk.
- Click the Opportunity form SAVE icon
The Reminder will appear on View > My Tasks for the Sales Rep identified on this Opportunity record

From the Sales Opportunity, create an Activity and set Reminder details:
- Go to Sales > Opportunity and open the Opportunity record you want to view (Opportunities may also be accessed via a Customer record)
- Place the form in EDIT mode
- Click the Activities subtab, then click the Add icon. A new Activity record displays
- Fill in the appropriate Activity details, including the Sales Rep
- Click on the Follow Up Date field and specify the Date and Reason for the Reminder
- Click the Save icon
- Note: the above may alternatively be used to edit an existing Activity if needed
Sales Funnels#
Sales Funnels in Q360 visualize and track opportunities as they move through sales stages so you can measure conversion rates, spot where deals drop out, prioritize follow-ups, and produce more accurate pipeline forecasts.
For detailed instruction, see sub topics to the left.
Assign Funnel Steps to a Resource#

You can assign a resource such as another User to a Funnel Item
- Open an Opportunity record you want to view
- Click the Funnel sub tab and open the Funnel Item you want to assign
- Click the EDIT icon and edit the necessary fields, including:
- Schedule Date
- SCHEDDATE – scheduled start date
- ENDDATE – anticipated end date
- Assignee – select a User from the drop down options
- Estimated Effort (hours)
- Status Code – Change to ASSIGNED or INPROGRESS if you are assigning this Funnel Step
- Time Bill Category
- Click the SAVE icon
- To schedule this assignment at this time or add an Activity, click on the Schedule tab or Activity tab and then the ADD icon. Complete all fields for which you have information
Note: the User who has been assigned a Funnel Step will see a Task of type “Opp Task” in their Task List
Update a Funnel Step#

To update a Funnel Item that is assigned to you, complete the following steps:
- Go to View > My Tasks, open a Task of type “Opp Task” to update. The Funnel Opportunity Item form will open
- Click the EDIT icon
- Make the required changes to the Funnel Item
- Click the SAVE icon
Funnel Items may also be updated via the Resource Console:
- Open the Resource Console and click on the Opportunity Funnel Items subtab
- Drill into a Funnel Item. The Funnel Opportunity Item form will open
- Click the EDIT icon
- Make the required changes to the Funnel Item
- Click the SAVE icon
Mark Funnel Steps Complete#

After each Funnel item is completed, it must be marked as such within the Opportunity
- Open an Opportunity record and click the Funnel subtab
- Highlight the rows you want to mark “complete” (or check the checkbox on these rows)
- Click the Extended Menu on the Funnel grid and select the “Mark as Complete” option. The grid will auto-populate with the “Actual” completed date and the UserID of the person who marked the Funnel Item as “Complete”
Sales Quotes / Orders#
Sales Quotes in Q360 are formal, itemized proposals you send to a customer showing scope, pricing, discounts, taxes, terms, and an expiration — used to win business. Sales Orders are the confirmed commitment (often created by converting an accepted quote) that kicks off fulfillment, scheduling, invoicing, purchasing, or project work.
For detailed instruction, see sub topics to the left.
Create and Process Quotes#

This section describes how to create a Quote from an Opportunity and how to process the Quote
Create a Quote for an Opportunity
- Open a Sales Opportunity
- Click the Quotes tab, then click the Quotes grid Add icon. The new Quote contains details carried over from the Opportunity. From here you can add other necessary information.
- Pay particular attention to the Sale Type field. This selection will determine whether a Project, Service Contract or Service Call will be created
- Note: Quote Header tab contains the field GP / Hr – this field displays Gross Profit per hour and is calculated as [Total GP (Gross Profit) divided by Total Hours]
- On the Line Items tab, add some Line Items or Quick Lists as needed (using the Find Product Sub Tab). These are detailed in additional Quote Procedures.
- Click the Save icon
For more information on building Quote Line Items, see Build Quote Sections and Build Quote Line Items
Process a quote
- Open a Quote you want to send for approval
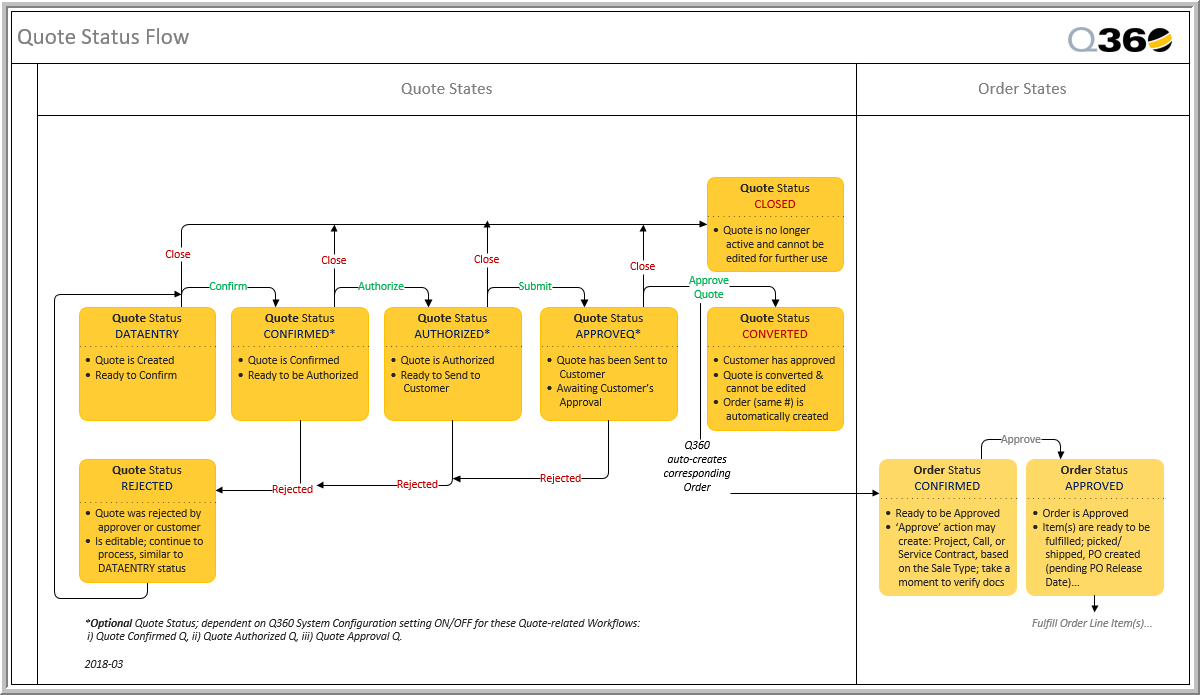
- Click the Process icon, then click the Confirm Quote button. This changes the Status of the Quote from DATAENTRY to CONFIRMED
- The Quote will be sent through the AUTHORIZED, SUBMITTED, and APPROVED process, as illustrated on this Q360 Quote Status Flow
Build Quote Sections and Subsections#
Q360 versions 22.02 + offer new enhancements to the Quote process. Sections organize Quote Line Items into clear, predictable blocks, streamlining the review and approval processes.
Quote Sections – End-to-end Flow

To begin using Sections and Subsections within a Quote, make sure the record is in EDIT mode and then click on the Line Items tab of a Quote.
Add Section (or Sub-Section) using Add button:
- Click EDIT button if the form is not already in EDIT mode
- Click Add icon on the Line Items grid and select Add Section or Add Sub-Section. Note: Sub-Sections may only be added after at least one Section has been added
- A pop-up window will open where you will type a Description of your new Section. Enter a name and click OK
- To add a Sub-Section, highlight a Section and click the grid Add icon again to create a Sub-Section. Repeat step 3 to name your Sub-Section
- Repeat Sub-Section process as many times as needed. Sections and Sub-Sections may be nested within one another to whatever level is required
- To reorder nested Sub-Sections or move them to new Section, use the Drag Handles next to the Item in either the Line Items grid or the Sections panel
Add Section (or Sub-Section) using Sections icon on Line Items grid:
- Click EDIT button if the form is not already in EDIT mode
- Click Sections icon on Line Items grid. The Sections panel will open
- Click the ADD icon in the Sections panel and select “Add Section”
- A pop-up window will open where you will type a Description of your new Section. Enter a name and click OK
- The newly added Section will be appear in both the Line Items grid and the Sections panel
- To add a Sub-Section, highlight a Section in the Sections panel and then click the Sections panel ADD icon again (select the Add Sub-Section option this time)
- A pop-up window will open where you will type a Description of your new Sub-Section. Enter a name and click OK
- The newly added Sub-Section will be appear in both the Line Items grid and the Sections panel
- To reorder nested Sub-Sections or move them to new Section, use the Drag Handles next to the Item in either the Line Items grid or the Sections panel
Note: Q360 will respect Sectioning, Grouping and Sequencing of Sections and Subsections when printing a Quote
Add Items to a Section or Subsection:
- Highlight Section or Sub-Section to which you wish to add Items
- Click on the Find Product or Advanced Find Product icon within the Line Items grid
- Use the Search box or Advanced Search options to find Products. Add Product by highlighting the Item and then click the ADD icon in the Parts grid
- Click SAVE button when you have finished adding Items to your Sections and Sub-Sections
Note: Kits (K type items) behave differently when added to a Quote. They will appear as a separate Section containing all Items kitted together. If this Kit belongs within another Section, simply drag and drop the Items into that Section and delete the Kitted Section (now empty)
Add Section using Quick List or add Quick List to an existing Section:
- Click the Quote form EDIT button
- Using the Line Items grid Quick List icon, search for and select a Quick List
- A pop-up window will appear asking you to choose the Cost Source and Price Source. Make your selections and then click OK
- The Quick List you selected will appear in the Line Items grid as its own Section which may be renamed, moved, or nested within the grid using the Sections area as described above
- Alternatively, Quick Lists may be added to existing Sections or Subsections by highlighting the Section or Subsection to which the Quick List should be attached and then following steps 2-3 above. The Items in this Quick List will appear in the Line Items grid nested under the current Section
- Click the record SAVE icon
Quantity Function (Section Multiplier):
It is not necessary to add numerous identical Sections Item by Item to a Quote. The Qty column of the Line Items grid is editable when the grid is in Edit mode. Double click in the Qty column next to the Section you would like to multiply and enter the number of identical Sections you would like the Quote to contain. The Ext Qty column will then display the total number of each Item included in the Quote. Save the form
Note: Both Sections and Subsections may be multiplied using this option
Grouping Items (using Group columns) – Update Group Fields by Section:

- Click the Edit button
- Click the Expand icon on the Line Items grid to expand all Sections and Subsections
- From the Extended Menu of the Line Items grid, select Update Group Fields by Section
- A pop-up window will open asking “Which group field do you want to update?” Select “Dynamically by section depth” from the drop-down menu and click Confirm. This option recognizes that the overarching Section is the ‘main’ Section for the Quote and assigns this Section to the Group 1 column. Subsequent level 2 Subsections are grouped within the Group 2 column, level 3 Subsections are grouped within the Group 3 column and so forth
- Save
Note: Grouping on the Quote level will be maintained through to the Material tab of a Project created from this Quote
Quotes will process forward to Projects as they always have, using the Process button
Once your Quote has been converted to an Order, you will notice that Sections that were multiplied on the Quote have been split into separate Line Items. These may be renamed at this point if needed. Subsections under each Section have carried over to the Order and may be viewed by expanding the Sections. Subsections may be renamed at this point if needed
Quote Duplicate vs Copy Functions

Quote Sections: Duplicate
- Quote > Line Items tab with sections already added. Put form in EDIT mode
- Locate a Section on the Sections subtab. Right click on the Section you want to duplicate and select “Duplicate This Section.” The new duplicate Section will be added to the Sections subtab and to the Line Items grid. This option is used when you want the duplicate Section to appear on the same Quote
- Description, quantity, pricing and other changes may be made directly in the Line Items grid by double clicking in a cell
- Save Quote
Quote Sections: Copy
- Quote > Line Items tab with Sections already added. Put form in EDIT mode
- Locate a Section on the Sections subtab. Right click on the section you want to duplicate and select “Copy This Section.” This option is used when you want to add the copied Section to a different Quote
- Open the Quote to which you want to add the copied Section. Highlight a Line Item on the Line Items grid to which you would like to add the Section copied above
- From the Line Item grid Extended Menu, select either “Paste Selected Item(s) Before” or “Paste Selected Item(s) After.” Copied selection from previous Quote will appear in the new Quote
- Description, quantity, pricing and other changes may be made directly in the Line Items grid by double clicking in a cell
- Save Quote
Quote Sections – Split Line Items

Build Quote Line Items#

Add Line Items
- Open a Quote record and click the Line Items tab
- Click the Edit button, then click the Find Product subtab
- Use the search field to refine the search and press the Enter key. The Parts grid displays the results based on filtering
- Click the Add icon next to the Item you wish to add. The Item will appear in the Line Items grid of your Quote
- Optional: select the “Special Order” flag checkbox to indicate that this Quote Item should later appear in the Purchasing Queue for Purchaser to explicitly purchase the Item (regardless of Master Item type or whether there is sufficient quantity available on hand in Inventory)
- Click the Save icon
Copy Line Items
Copying Line Items from an another Quote can be useful if there are a lot of Items to add to your Quote
- Open the Quote you are building and click the Edit icon
- Click the Line Items tab and highlight the rows you want to copy
- In the Line Items grid Extended Menu, select Copy Selected Item(s)
- In the Quote you are building, select Paste Selected Items(s) After. The copied Items will display in your Quote
Group Line Items
Grouping arranges Quote Line Items within five possible Groups with default captions Group 1 to Group 5. When a Quote is printed, only Group 1 and Group 2 are referenced, and dependent on your configuration.
To set the Group 1 and Group 2 values for Quote Line Items complete the following steps:
- With the Quote in Edit mode, do the following:
- Find the Group 1 column and highlight the Line Item rows you wish to group
- In the Line Items grid Extended Menu, select Update Group Fields, and enter the text description
- In the grid, verify the selected row’s Group 1 value is updated with the text
- To further categorize a subset of Group 1 line items, do the following:
- Find the Group 2 column and highlight the line item rows you wish to group
- In the Line Items grid Extended Menu, select Update Group Fields, and enter the text description
- In the grid, verify the selected row’s Group 2 value is updated with the text
- Repeat this process as required
Add Statement of Work (SOW) content
- In the Quote, click the SOW tab
- Click the Edit icon and enter text in text box. Format as needed
- Optionally, you can insert a link, table, image or Global Comment using the respective icons above the text box
- To save your text as a Global Comment, click the “Save as Global Comment” icon above the text box
- Click the Save icon
Split Quote Line Items#
Line Items containing multiple quantities of the same Item can be split into multiple lines within a Quote. For example, if there are different purchasing needs for the same part, or you need to group specific quantities for different rooms on a Project
To split Line Items in a Quote, complete the following steps:
- Open a Quote record and click the Line Items tab
- Highlight the Line Item you want to split. Note that the Quote does not have to be in Edit mode to split Items
- From the Line Items grid Extended Menu, select one of the following options:
- Split This Line Item – Specify the quantity that you want the new line to be split into. The remaining quantity remains in the original row
- Split This Line Item Into Singles – The Item is split into individual lines based on the quantity of the original Line Item
Also note the following information when splitting Quote Line Items:
- Only one Line Item can be split at a time
- Canceled Line Items cannot be split
- Only Line Items that are type L or M can have decimals
- If a Line Item has negative quantity, the split quantity must be negative. A split quantity cannot be less than the Item quantity
- If an Item has positive quantity, the split quantity must be positive. The split quantity cannot be more than Item quantity
- A split quantity cannot be the same as a Item quantity
- A split quantity cannot be zero
Manage Optional Flags on Quote Line Items#
The Optional Flag capability on Quotes and Proposals now allows users to quote optional items to customers without the need to send out multiple versions of a Quote.

- Open a Quote record and click on the Line Items tab
- Click the form EDIT icon
- In the Optional column, check the boxes for the Line Items you wish your Customer to see as “Optional”
- Click the form SAVE icon
- Click the Printer icon and select “Print Quote”
- From the Print Report window, select desired Template, Parameters, Destination, Options and Format and click Print button
When the Print Preview opens, you will see the Optional items selected in step 3 above listed in a different color and font, and an Optional Total calculated amount will be displayed in the related Quote section. All Optional equipment will also be totaled and displayed at the bottom of the Quote.
If the Customer accepts and approves the Optional Items, you will need to return to the Line Items grid on the Quote, highlight the Optional Items, click on the Extended Menu and select the option to “Approve Optional Item(s).”
If the Customer rejects the Optional Items, you will need to return to the Quote, click the Process button and click the Reject Quote button in the window that appears. You may then edit the Quote to remove the unwanted Optional Items.
Note: a Quote cannot be processed into an Order until all checked Optional Items have been approved or removed.
Approve Customer Authorized Quotes#

After the Customer or Prospect agrees to proceed with the Quote, you must convert the Quote to an Order. Quotes awaiting approval will be in APPROVEQ Status.
- Open a Quote and click the Process icon. Note that Quotes may be accessed individually via the Sales Menu > Quotes path, or by navigating to the Approval Queue (Sales Menu > Work Queues > Quotes in Approval Queue), or via the Sales Overview Workflow > Submitted Quotes bucket.
- In the Process Record window, click Approve Quote. A new Order, with same (Quote) number, will open in CONFIRMED status. This Order will have the same Sale Type as the originating Quote.
- Make any additional changes to the Order as needed, including POs and / or documentation
- Click the Save icon on the Order record. The Originating Quote will now be in CONVERTED Status.
Note: Depending on the Sale Type field in the Quote record, approving a Quote may automatically generate a Project, Service Contract, or Service Call
Extended Quote Authorization Rules#

This section describes how to set up Quote Authorization Rules if you want to specify parameters under which Sales Quotes can be approved. For example, you can assign general Sales staff a Price, Cost, or Margin limit for approving Quotes, while granting the Sales Management and Executive teams different approval amounts
To create Quote Authorization Rules, complete the following steps:
- Go to Sales > Sales Admin > Extended Quote Authorization Rules and click the ADD icon. A blank Quote Authorization Add form will open
- Add details to the form:
- Title – a description of the rule that displays in the Quote Authorization Rule List grid
- Authorizer – the User who will receive the authorization message when attempting to authorize a Quote, should the rule apply
- Branch – the Branch that applies to the authorization rule
- Department – the Department that applies to the authorization rule
- Sale Type – the Type of Sale related to the authorization. By default, the list is from the general code UNIFIEDTYP
- Sub Total Max – the value that displays in the Sub field in the main Sale tab of the Quote form
- Cost Max – the value that displays in the Total field in the main Sale tab of the Quote form
- Margin Min – the Minimum Margin Percentage required for the Quote to be authorized, using the GM% field in the main Sale tab of the Quote form
- Enable check box – specifies that the rule is active. If un-checked, the rule will not apply to Quote authorization
- Failure Message – this error displays when the rule applies and Quote authorization is denied
- Click the SAVE icon
For additional detailed instruction, use case and example, please refer to Extended Quote Authorization Rules
Print a Quote#

To print a Quote Proposal:
- Go to Sales > Quotes and open the Quote you want to print
- Click the Print icon and select “Print Quote”
- In the Print Report window that opens, select the Report No. you want to print
- Select your desired Print Destination
- In the Print Format section, select the file type to output the Quote
- Select additional options in the Report Options section i.e. include or exclude particular sections / lines on the Quote
- Click the OK button
Approve Customer Orders#

After the Customer has approved a Quote and the Order is generated, the Order must be approved internally
- Open an Order record
- Click the PROCESS icon
- In the Process Record window that opens, click the Approve Order button. If the Order is not linked to a Project, you will be asked in a new window if you would like to choose a Project Template and create a Project. Select OK or No. The Status field in the Order will change to APPROVED.
Note the following:
- Prior to changing the Order from CONFIRMED to APPROVED, the Order displays in the Orders Pick Q, but not in the Shipping Q
- When an Order is in APPROVED status, it displays in both the Orders Pick Q and the Shipping Q
- When an Order is in APPROVED status, changes such as adding and removing Items can no longer be made
Sales Admin / Other#
This section contains Administrative / Executive Sales procedures in Q360.
For detailed instruction, see sub topics to the left.
Create a New Sale Type (Unified Type)#

Add a new Sale Type:
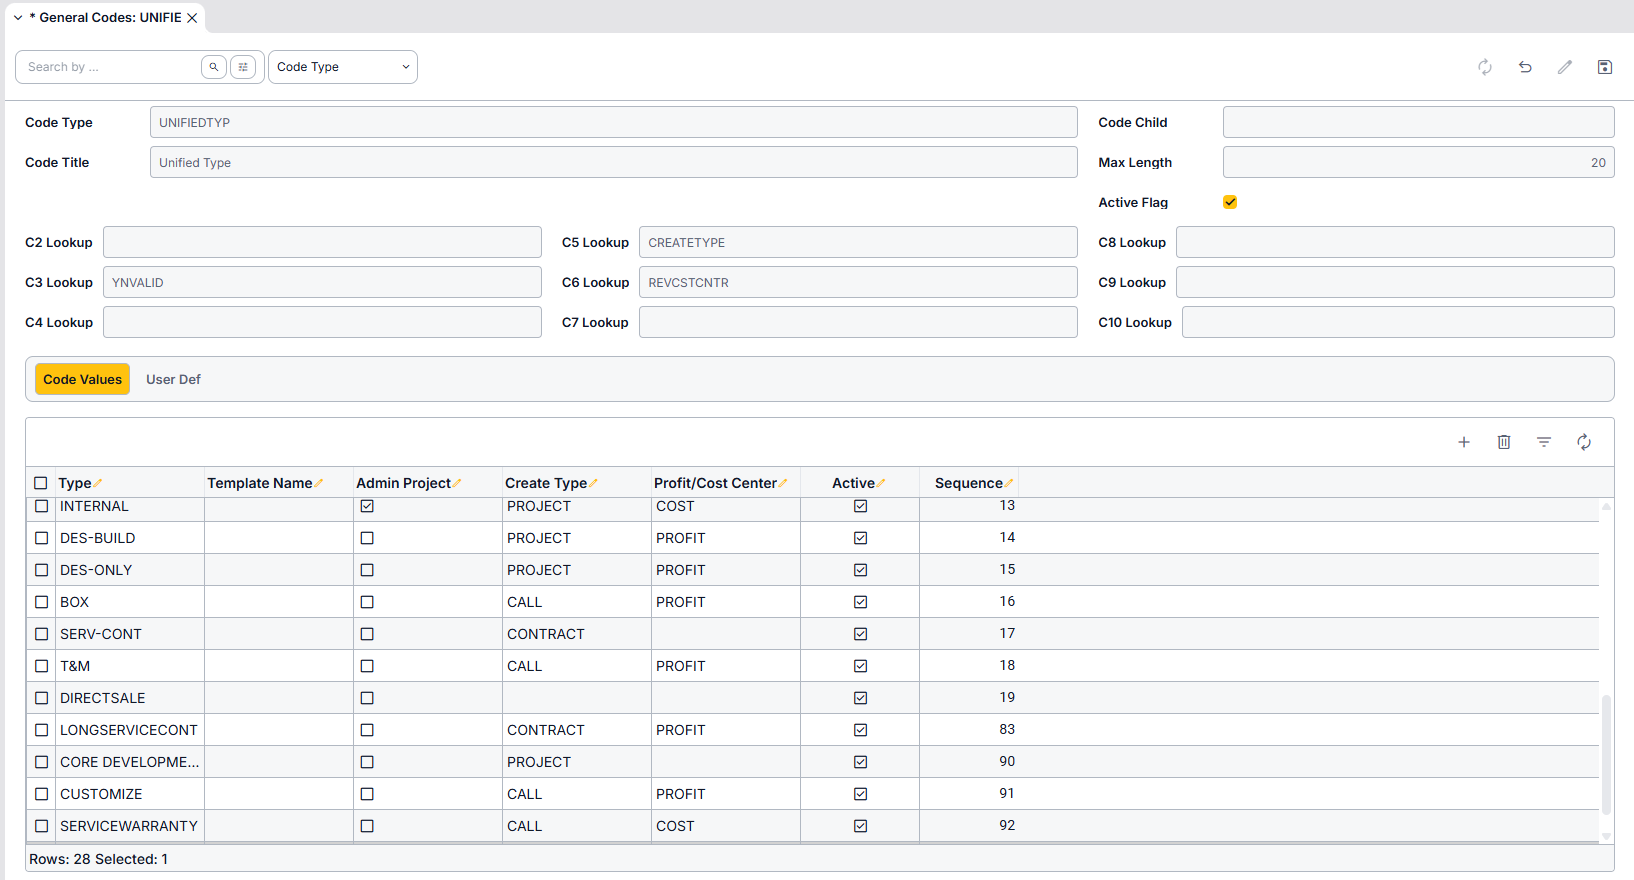
- Go to Maintenance Menu > General Codes
- Search for UNIFIEDTYP in the General Codes form. A list of existing Unified Type Code Values will display in the grid
- Put the grid in EDIT mode and click the ADD button. A new blank row will appear at the bottom of the grid.
- Enter information on the new row:
- Type: Determines the values that may be selected from the Sale Type drop down menu on a Opportunity, Quote, or Order
- Optional – Template Name: If the new Unified Type is intended to create a Project from a Template, specify a Project Template Title that will be used when approving the Order. Note: Q360 will NOT prompt you to select a Template upon approving the Order
- If the new Unified Type is intended to create an Admin Project, select Y in the Admin Project column to indicate that the resulting Project should be Internal
- Create Type: indicate what should be created when an Order is approved. Options include Project, Call, Contract (Service Contract), or Blank (will remain as an Order only)
- Profit / Cost Center column: Set this to Profit if the Unified Type is a type of sale to customers, or Cost if this is an internal sale type
- Active column: Check the box if the selected type should be displayed in the Sale Type drop down menu of the Opportunity, Quote, and Order forms
- Sequence field: determines the order in which Type options appear in the Opportunity, Quote and Order Sale Type drop down menus. This option is purely aesthetic.
- Click SAVE icon
Part 2: Add Default Extended Accounts in Accounting Menu
Configuring Default Extended Accounts involves setting up specific Accounts for the new Sale Type:
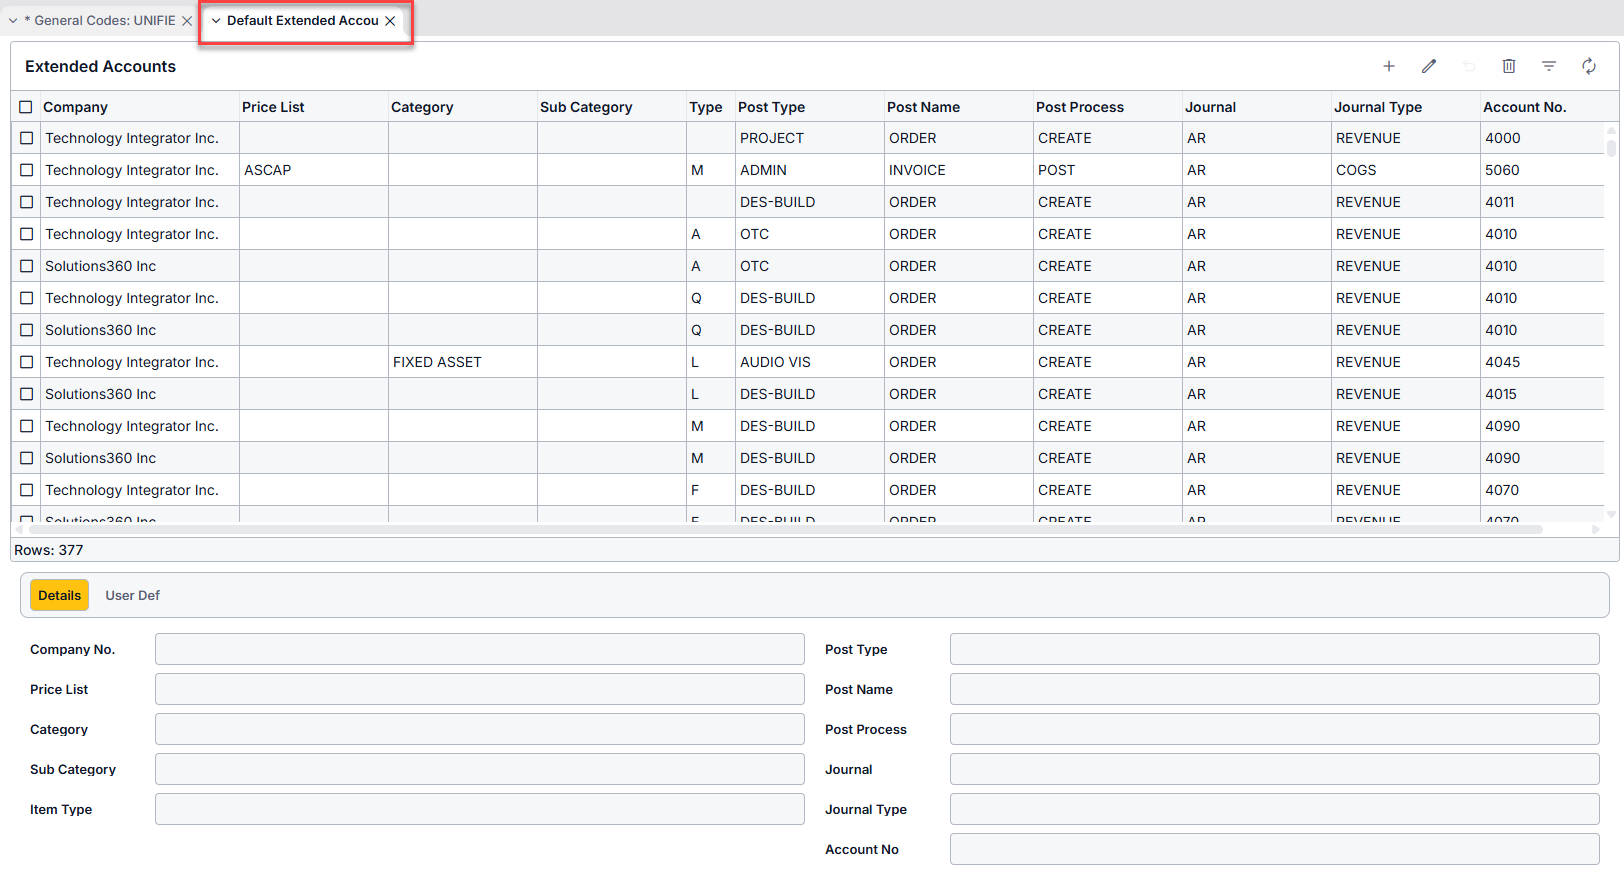
- Go to Accounting Main Menu > Admin > GL Admin > Default Extended Accounts
- Use the ADD icon to add new Extended Account rows (typically 18 rows per Company and Sale Type)
- For each Item Type (A, Q, L, M, etc.), including a BLANK item Type, create a minimum of two entries (depending on your process)
- Highlight each new row and either complete the fields for that row using the Details sub tab form below the grid, or double click inside the cell you wish to edit (note” form must be in EDIT mode for this)
- Select Post Type (the new Sale Type you created above)
- Select Post Name (ORDER or INVOICE) – you must assign one each for each Item Type
- Select Post Process (CREATE or POST) – you must assign one each for each Item Type
- Select Journal (this will typically be AR)
- Select Journal Type (REVENUE or COGS) – you must assign one each for each Item Type
- Select Account No. – these are your Company’s GL Account Numbers
- NOTE: see grid pattern in below screenshot – For Post Name ORDER, Post Process should be CREATE and Journal Type should be REVENUE. For Post Name INVOICE, Post Process should be POST and Journal Type should be COGS
- Special instruction for COGS account type:
- Be sure to set appropriate Job Cost Type and / or Job Cost Class for accuracy – these fields will appear in the form below the grid
Set Up a Sales Funnel Template#

This section describes how to set up a Sales Funnel Template
- Go to Sales > Sales Admin > Funnel Administration and click the ADD icon.
- Fill in Funnel details on the Funnel form > Funnel tab
- Funnel Definition: input a distinct name for this Sales Funnel
- Type: select from drop-down list based on values defined by General Code FUNNTYPE
- Phase Count: specify the number of phases to be defined in this Sales Funnel. Default value = 1
- Default Flag: select the checkbox to define this as the default funnel to display from Sales Main Menu > Quick Views > View Funnel
- Funneldef No.: this number is automatically assigned by the system
- Set up each phase (to a maximum of 9 phases) for this Sales Funnel
- Associate a Probability % to represent the likelihood of the Sales Opportunity closing, where the higher the phase completed, the higher the probability
- The % probability input for each phase needs to include cumulative probability of any phases previous to it; and be less than 100 (since a value of 100 would indicate a certainty in closing the Sale)
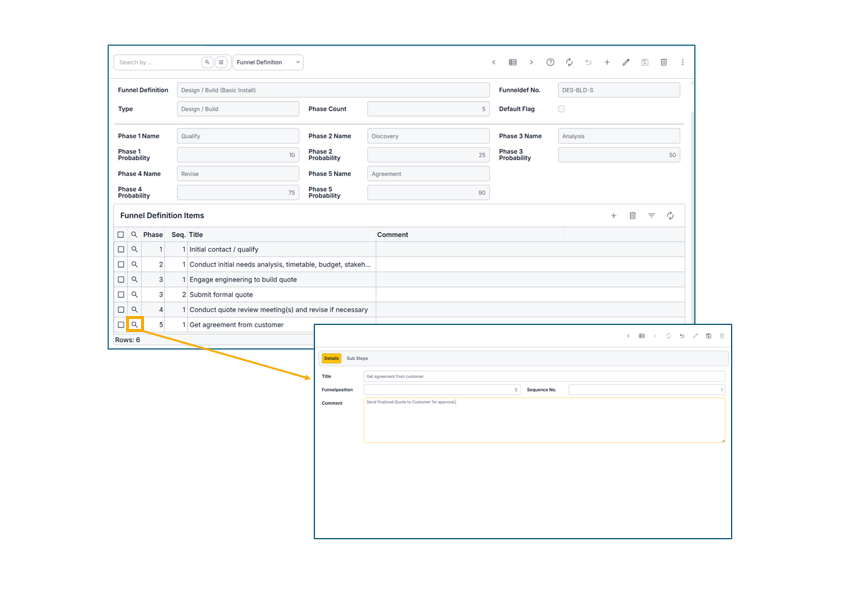
- Click the Save icon to save the phase. The Funnel Definition Items grid will appear.
- For each phase, define at least one step, i.e. a Funnel Definition Item
- On the Funnel Definition Items grid, click the Add icon and define its attributes in the “Funnel Def Item: Add” window that appears:
- Title: input the name of this step
- Funnel Position: specify which phase this step belongs to
- Sequence No.: specify the numbered sequence this step exists as part of this Funnel
- Comment: optionally add more text details as necessary
- Click the Save icon to save this step
- Repeat for as many steps as needed for this phase
- On the Funnel Definition Items grid, click the Add icon and define its attributes in the “Funnel Def Item: Add” window that appears:
Suggestion: as a next step, your administrator may configure this sales funnel definition to a Sales Opportunity interest
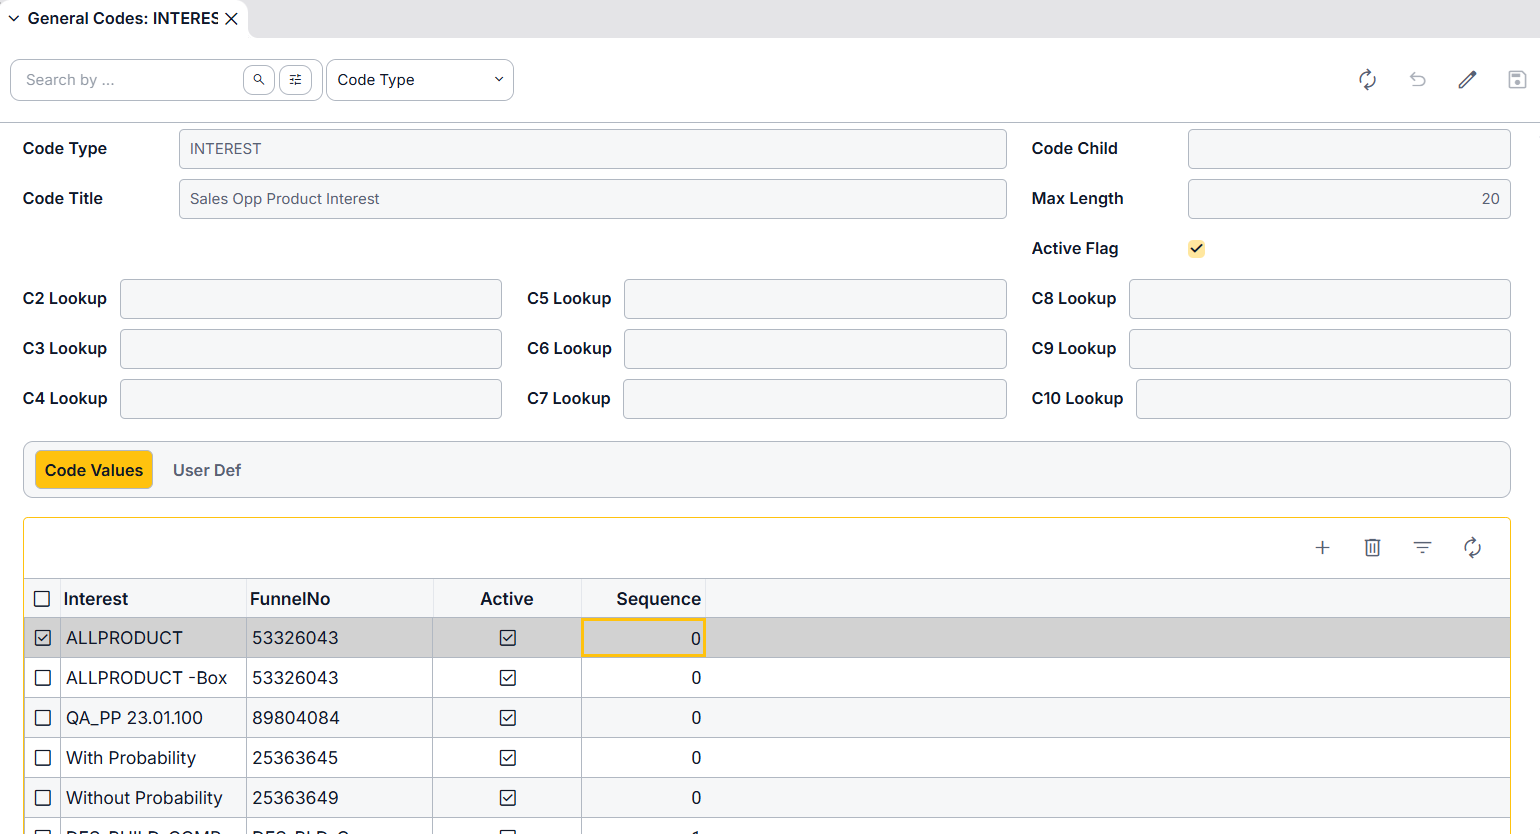
Configure Opportunity Interest to a Funnel#
Configure a Sales Opportunity “Interest” to a default Sales Funnel Template
Pre-requisite: the Sales Funnel is previously created (see “Set Up a Sales Funnel Template“) and you have noted down its FunnelNo
- Go to Maintenance > General Codes
- Search for code “Interest” representing the “Sales Opp Product Interest”
- Notice the list of “Interest” values that display
- If the desired “Interest” value exists, proceed to step #2
- Otherwise create a new “Interest” for the business Sales Opportunity
- In Edit mode, click the Code Values grid ADD icon
- Fill in the details, including name of the new “Interest” row
- In EDIT mode: for the selected “Interest” value row, link the Sales Funnel to the Interest:
- Fill in the column FunnelNo (by default it is blank) of the Sales Funnel template
- Click the SAVE icon
Sales Forecast#

The Sales Forecast report displays a overview of all the Sales Opportunities in the system. This report can be used by Sales Reps as well as Sales Managers to review Opportunity close dates and Opportunity movement.
- Sales Main Menu > Quick Views > Sales Forecast
- Use filters to refine forecast by Company, Branch, Department, Sales Rep, Probability, and / or Forecast From Date
Default report view sorts this report by Sales Rep. Total per Sales Rep will display in the bottom line of each Sales Rep section.
Sort by another column:
- Right click in a column
- Select “Group By [Column Name]. The grid will reorganize into sections based on the options available in the column you grouped by.
- Apply additional filters as needed
Opportunity Comments
You may view any Comments attached to an Opportunity by hovering over the Comment icon (speech bubble). These Comments reflect the main Comment field on the Opportunity.
Opportunity Movement: Status vs Prev Status
The Status column fields will display as either red or green depending on whether the Opportunity is moving backwards (red) or forwards (green) in the process. This is determined by comparing the values in the Status column to the values in the Prev Status column.
Opportunity Value
The Value column color coding operates as follows:
- Red: this Opportunity has decreased in Value
- Green: this Opportunity has increased in Value
- No color: the Value of this Opportunity has not changed since it was created
Weighted Total
Value weighted against the probability of closing this Opportunity
Rec Monthly Rev: Recurring Monthly Revenue
This column indicates the monthly portion of the total revenue
Close Date
Close date column reflects the most recent entered Close Date estimate. Colors in this column reflect comparison to the Prev Close column. Red indicates the Close Date has “slipped” or been pushed out beyond the Prev Close date. Green indicates an acceleration and we now expect the Opportunity to close sooner than we originally anticipated.
% Column
This column reflects the Probability of Opportunity Closure. This will be used in conjunction with the Status column to indicate whether an Opportunity is moving forwards or backwards in the process.
Overdue
Cells in this column should always reflect $0.00. Items with a value and colored red require immediate attention.
Closure Date Ranges 0-30, 31-60, 61-90, >90
These columns reflect which Opportunities we expect to close within the next 0-30 days, 31-60 days, etc.